Character rigging is one of the most critical aspects of 3D animation. It involves creating a digital skeleton that allows animators to bring characters to life with movement and expression. Whether you’re working on a video game, animated film, or VFX scene, mastering character rigging ensures your characters move smoothly and realistically.
In this post, we will explore the best tools and techniques for character rigging in 3D animation, explain how rigging works, and offer tips to make the process easier. Additionally, we’ll discuss how a Cloud Render Farm can enhance your workflow by accelerating your renders and simplifying the rigging process.
What Is Character Rigging?
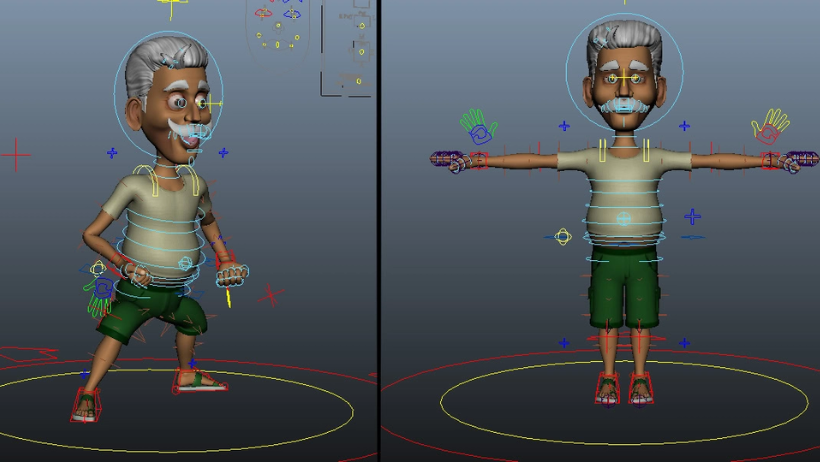
Character rigging is the process of creating a skeleton for a 3D character model. This skeleton, known as a rig, is made up of bones (joints), controls (handles), and deformers. The purpose of the rig is to allow animators to move and manipulate a 3D character in a realistic way.
Without proper rigging, a 3D character would be stiff and incapable of movement. Rigging brings a model to life, providing the structure needed for realistic animations. Think of it as adding the bones to a puppet: once the rig is in place, you can animate and control the character’s movement.
Why Is Character Rigging Important?
Character rigging is essential for several reasons:
- Realistic Movement: With a good rig, you can animate characters in a way that makes them appear natural and believable. Properly rigged models will bend and stretch in ways that mimic how living creatures move.
- Animation Efficiency: Rigging enables animators to work more efficiently. Instead of adjusting every individual vertex of the character, animators can use the rig to control the character’s entire body.
- Ease of Manipulation: A well-designed rig gives animators more control over the character. The right controls allow easy adjustments for facial expressions, body movement, and even subtle details like finger movement.
Essential Tools for Character Rigging
Several tools are widely used in the industry for character rigging, ranging from beginner-friendly to highly advanced options. Let’s dive into some of the most popular tools available today:
1. Blender
Blender is an open-source 3D creation suite that offers powerful rigging tools for animators. It includes:
- Armature System: This tool allows you to build your character’s skeleton (bones), which you can then connect to the mesh for movement.
- Inverse Kinematics (IK): IK helps automate the movement of a character’s limbs. For example, when animating a character’s arm, IK makes sure the elbow, wrist, and fingers move naturally.
- Shape Keys and Drivers: These tools are perfect for facial rigging and adding expressions, allowing the character’s face to move with ease.
Blender’s rigging tools are powerful, flexible, and free, making them a great choice for both beginner and experienced animators.
2. Autodesk Maya
Maya is another industry-standard software commonly used for character rigging. It’s known for its robust rigging system, which includes:
- HumanIK: A built-in tool for creating human characters and quickly rigging them with realistic bone structures.
- Custom Rigging Tools: Maya offers advanced custom rigging options, including muscle rigs, facial rigs, and character animation controllers.
- Advanced Skinning: Maya has powerful tools for skinning a character to its skeleton, ensuring that the mesh deforms smoothly during animation.
Maya is ideal for larger teams and more complex projects that demand high levels of control and customizability.
3. Cinema 4D
Cinema 4D is another tool that offers excellent rigging capabilities, especially for motion graphics and simple 3D character animation. It is easier to use compared to Maya and Blender, which makes it a good choice for beginners.
Key features include:
- Pose Morphing: This feature allows you to create different character poses and facial expressions, which you can easily switch between.
- Character Object System: This is Cinema 4D’s solution for rigging characters. It allows you to add bones, joints, and controls quickly.
Cinema 4D is a popular choice for smaller projects and artists who need a more straightforward rigging system.
Character Rigging Techniques
Once you have your tools set up, the next step is applying the right techniques to create smooth, flexible rigs. Let’s look at some core techniques for effective rigging.
1. Bone Placement and Skinning
The first step in character rigging is creating bones (joints) that correspond to the key parts of your model. Once you’ve placed your bones, you will skin the character, which involves attaching the model’s mesh to the rig. This allows the model to deform when the bones move. Use the Weight Painting technique to ensure the mesh deforms naturally.
2. Inverse Kinematics (IK) vs. Forward Kinematics (FK)
Both Inverse Kinematics (IK) and Forward Kinematics (FK) are essential for animating characters.
- FK allows animators to control the movement of each bone individually, working from the base of the limb to the tip (e.g., shoulder to hand).
- IK, on the other hand, automatically adjusts the bones of a limb based on the position of the last joint (e.g., wrist or foot), making it easier to pose characters.
3. Facial Rigging
Facial rigging is crucial for creating expressive characters. Use blend shapes or shape keys to create different facial expressions (smiling, frowning, etc.). You can also use controllers to manage eye movement and lip synchronization for speech.
4. Weight Painting
Weight painting is used to determine how much influence each bone has on a specific area of the mesh. The more weight a bone has, the more influence it has over that region. Proper weight painting ensures that the mesh deforms smoothly during animation and prevents stretching or distortion.
>>> Read more: A Complete Guide to Baked Lighting in Real-Time Rendering
How 3S Cloud Render Farm Enhances Your Rigging Workflow
While character rigging can be time-consuming, using a Render Farm like 3S Cloud Render Farm can help speed up the rendering process significantly. Rendering large scenes with detailed rigs requires powerful hardware, and 3S Cloud Render Farm provides the resources you need to work efficiently.
Here’s how 3S Cloud Render Farm can improve your workflow:
- Faster Rendering: 3S Cloud Render Farm uses powerful GPUs and CPUs to process your animations quickly, reducing the wait time significantly.
- Support for Complex Rigs: With a Cloud Render Farm, you can render complex scenes with detailed rigs and textures faster, even if your local machine doesn’t have enough power.
- Scalability: You can scale your render jobs across multiple servers, allowing you to process several animations or scenes simultaneously.
By using 3S Cloud Render Farm, you can focus on the creative side of character rigging and animation, while letting the farm handle the heavy rendering work.
Final Thoughts
Character rigging is a vital step in 3D animation, and understanding the tools and techniques involved will help you create lifelike, expressive characters. Whether you’re using Blender, Maya, or Cinema 4D, knowing how to set up a strong, flexible rig will elevate your animation quality.
If you’re working on complex rigging projects and need faster rendering times, consider using 3S Cloud Render Farm. With its powerful hardware and scalable rendering solutions, you can accelerate your rigging process and bring your characters to life more quickly.