When creating 3D renders, lighting is one of the most important elements that brings your scenes to life. However, achieving realistic lighting without slowing down performance can be a challenge, especially in real-time rendering applications. Baked lighting is a powerful technique to solve this problem by pre-calculating lighting and saving it for later use. This method significantly enhances rendering speed while still delivering high-quality visuals.
In this post, we’ll explore baked lighting, explain how it works in real-time rendering, and show how it can optimize your workflow. We’ll also highlight how using 3S Cloud Render Farm can make your rendering tasks more efficient.
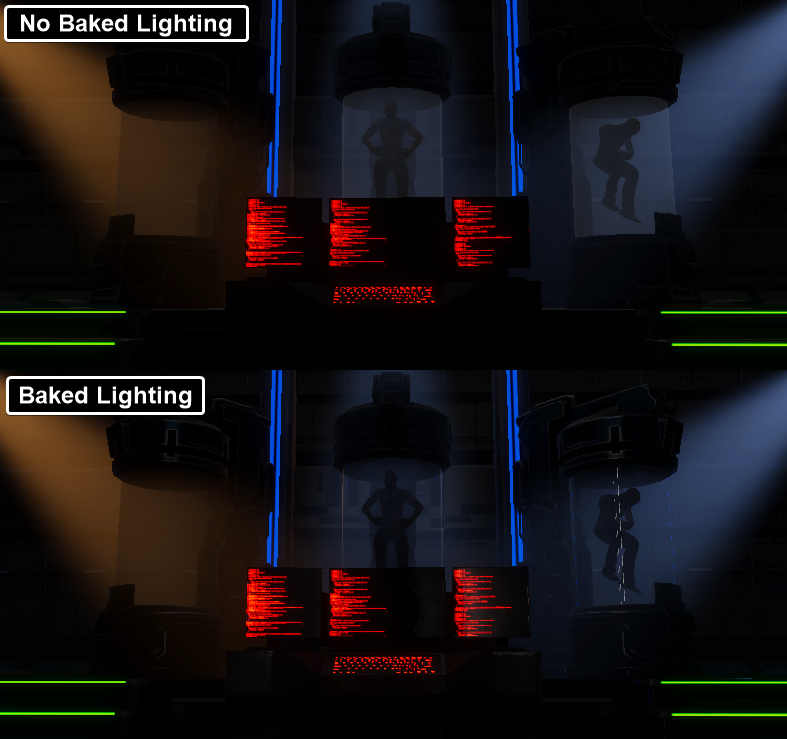
What is Baked Lighting?
Baked lighting involves pre-computing and storing lighting information in textures or lightmaps before rendering takes place. Instead of calculating lighting in real time, the renderer uses pre-calculated data during the actual rendering process. This approach frees up computing power and helps achieve faster render times.
It is especially useful in applications like video games, virtual reality, and architectural visualization where performance is crucial. By baking the lighting, you eliminate the need for real-time calculations, making it easier to work with large scenes and complex lighting setups.
Why Should You Use Baked Lighting?
In real-time rendering, balancing performance and visual quality is often difficult. Dynamic lighting and shadows can improve realism but tend to be computationally expensive. That’s where baked lighting steps in, offering several key benefits:
- Improved Performance: Pre-calculating lighting reduces the need for complex real-time calculations. This speeds up rendering, allowing you to achieve high-quality results without compromising performance.
- High-Quality Results: Baked lighting can simulate realistic effects like soft shadows, ambient occlusion, and light bounces. These effects would otherwise require substantial computational resources during rendering.
- Static Lighting for Static Scenes: If your scene doesn’t require real-time lighting changes (like in architectural walkthroughs), baked lighting provides a perfect solution for creating high-quality visuals without the computational overhead.
How Does Baked Lighting Work?
The process of baking lighting involves several steps, and it works alongside your scene’s other elements. Here’s how it generally works:
- Set Up Lighting: Start by setting up your lights in the 3D scene just as you would for a traditional render. You can use various types of lights, such as point lights, area lights, or spotlights.
- Bake the Lighting: Once the lighting setup is ready, the renderer pre-computes the light interactions and stores the results in textures (lightmaps). This data includes shadows, color information, and reflections based on how light interacts with surfaces.
- Apply Lightmaps: After baking the lighting, you apply the generated lightmaps to the surfaces in your 3D scene. The lightmaps act as static textures that hold the pre-calculated lighting information.
- Optimize for Real-Time Use: The final lightmaps are optimized for use in real-time rendering engines like Unreal Engine or Unity. They simulate realistic lighting conditions without using the computational resources required for dynamic lighting calculations.
Types of Baked Lighting
There are different techniques to bake lighting depending on the level of detail and performance needs. Below are some popular methods:
1. Lightmaps
Lightmaps are 2D textures that store baked lighting information. These textures get applied to 3D models in the scene, offering high-quality results without the need for real-time rendering. Lightmaps are commonly used for static scenes like architecture or interior designs.
- Pros: Excellent for static objects.
- Cons: Not suitable for dynamic objects.
2. Global Illumination (GI)
Global Illumination (GI) simulates how light bounces off surfaces and interacts with other objects in the scene. It can create more realistic lighting by accounting for indirect light. Baked GI is ideal for achieving photorealistic results, but it’s computationally intensive to bake.
- Pros: Produces realistic lighting effects, including light bounces.
- Cons: More resource-heavy than other methods.
3. Ambient Occlusion (AO)
Ambient Occlusion (AO) is a shading method that simulates soft shadows in corners or areas where light is blocked. By baking AO into lightmaps, you can achieve natural-looking depth and detail, especially in interior environments.
- Pros: Adds depth and realism.
- Cons: Can darken scenes if not used carefully.
How to Choose the Right Baked Lighting Method
The best method for baked lighting depends on your project. Here’s a quick guide:
- Lightmaps work well for static scenes where objects remain in the same position throughout.
- Global Illumination is perfect for high-quality visuals but requires more resources.
- Ambient Occlusion helps to create depth but should be used with caution to avoid darkening the scene.
Choosing the right method helps you balance performance and visual quality while ensuring your project runs efficiently.
Using Baked Lighting in Blender
In Blender, you can easily bake lighting by setting up your scene and using the Bake options under the Render Properties tab. Follow these steps:
- Set up your lighting and materials.
- Under the Render Properties tab, choose the Bake option.
- Select the type of bake you want (e.g., Lightmaps, Shadows, AO).
- Adjust the baking settings like samples and resolution for the lightmaps.
- Hit Bake and wait for the process to complete.
Once the baking is done, apply the lightmaps to your 3D models to simulate realistic lighting.
How a Cloud Render Farm Can Help with Baked Lighting
Even with optimized settings, rendering scenes with complex baked lighting can still take time. This is where a Cloud Render Farm comes in. By offloading your rendering tasks to a Blender Render Farm, you can access powerful hardware designed to handle these heavy workloads efficiently.
3S Cloud Render Farm offers high-performance rendering solutions that accelerate the process of baking lighting in your 3D scenes. With dedicated resources, you can render complex scenes in less time, allowing you to focus on other aspects of your project.
Here’s how 3S Cloud Render Farm can help:
- Speed: Quickly render high-quality lightmaps without delays.
- Scalability: Handle large, complex scenes with ease, no matter the size of your project.
- Cost-Efficiency: Pay only for the rendering time you use, without the need to invest in expensive hardware.
- Security: Keep your projects safe with secure file transfer and storage.
By using 3S Cloud Render Farm, you can speed up your workflow and achieve faster results, especially for complex baked lighting tasks.
>>> Read more: 5 Steps for 3D Artists to Create Photorealistic 3D Portraits
Conclusion
Baked lighting is an essential technique for real-time rendering, offering a way to enhance texture quality and lighting performance. Whether you’re using lightmaps, global illumination, or ambient occlusion, understanding how to use baked lighting can dramatically improve the realism and speed of your renders.
If you’re looking to speed up your workflow or need more power to handle complex projects, consider using 3S Cloud Render Farm. With their optimized rendering services, you can get the most out of your baked lighting techniques and deliver high-quality renders faster.