Blender sculpting is one of the most exciting and powerful features in 3D art creation. Whether you’re a beginner or looking to improve your skills, sculpting in Blender opens up endless possibilities. This tutorial will guide you through everything you need to know to get started with 3D sculpting and take your skills to the next level. Plus, we’ll discuss how using a Cloud Render Farm like 3S Cloud Render Farm can speed up your workflow and improve your results.
What is Blender Sculpting?
Blender sculpting allows you to shape and manipulate 3D models in a way that feels more like working with clay than traditional polygon modeling. It’s perfect for creating organic shapes like characters, animals, and detailed textures. In this process, you push and pull a model’s surface using various brushes, which gives you more freedom and control.
By mastering Blender sculpting, you can easily bring intricate designs to life without worrying about the technical limitations of traditional modeling. It’s all about adding creative detail to your 3D assets.
Getting Started with Blender Sculpting
1. Set Up Your Workspace
First, set up your Blender workspace for sculpting. Blender has a sculpting-specific layout, which makes it easier to access the tools you need. Simply click the Sculpting tab at the top of the window, and you’ll see the tools for sculpting in the sidebar.
Next, pick a base mesh. You can choose a simple object like a cube, sphere, or the famous Suzanne monkey head. Start with a basic shape and refine it as you go.
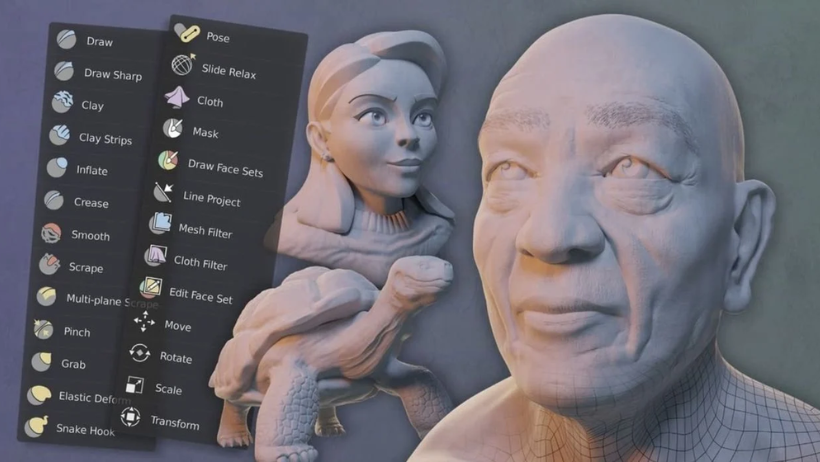
2. Understanding Brushes
Brushes are the key to sculpting in Blender. They determine how the surface of your model responds to your actions. You can think of each brush as a different tool with specific purposes. Here are some of the most useful brushes:
- Draw Brush: Pushes the mesh outwards to add volume.
- Smooth Brush: Evens out rough areas of the surface.
- Crease Brush: Adds sharp edges or folds in the mesh.
- Inflate Brush: Makes certain areas bulge out, useful for muscles and veins.
To use these brushes, adjust their strength, size, and falloff settings to suit your needs. Experiment with each brush to understand how it affects your model.
3. Use Dynamic Topology (DynTopo)
If you’re new to sculpting, DynTopo is a great tool. It dynamically changes the mesh’s resolution as you sculpt. This means you don’t have to worry about adding unnecessary geometry early on. Simply activate DynTopo in the Sculpt Mode, and Blender will automatically add more detail in areas where you need it, ensuring your mesh stays optimized for performance.
This feature allows for high detail in specific areas without overloading your model with unnecessary polygons.
4. Symmetry and Mirror
In the early stages of sculpting, symmetry is your friend. Blender allows you to mirror your sculpting actions on both sides of the model. This is helpful when working on characters or anything that requires symmetry.
You can activate X-axis symmetry (or Y and Z) from the Sculpting Tab. This saves time and ensures both sides of the model stay in sync.
5. Sculpting Basics: Block Out the Shape
Start by blocking out the basic form of your model. Focus on getting the overall shape right before adding any fine details. Use the Grab brush to move large sections, and the Draw brush to add volume.
At this stage, avoid getting caught up in the finer details. It’s better to have the right proportions and silhouette first. Once the major shapes are in place, you can begin adding smaller details, like facial features, muscles, and clothing.
Advanced Sculpting Techniques
Once you’re comfortable with the basics, you can move on to more advanced techniques to enhance your models.
1. Detailing with Multiresolution Modifier
The Multiresolution Modifier allows you to add layers of detail without affecting the low-poly mesh. This is useful when you need to add finer details like pores, wrinkles, or skin texture. You can switch between levels of detail to optimize your workflow and maintain performance.
2. Baking and Normal Maps
When working with high-poly models, consider baking the details into normal maps. This process saves time and ensures that your model can be used efficiently in real-time applications, such as video games. Normal maps simulate surface detail without the need for high-polygon geometry.
3. Use Masks to Protect Areas
As you sculpt, you may want to protect certain parts of your model from being affected by the brush. This is where masks come in handy. You can mask areas of the model, allowing you to sculpt other parts without disturbing the masked region. This is useful for maintaining sharp edges or protecting details you don’t want to alter.
Rendering Your Sculpted Models Faster with 3S Cloud Render Farm
Sculpting in Blender can take time, especially when working with highly detailed models or complex scenes. Once you’re satisfied with your sculpt, you can face long render times when it comes to finalizing the model.
Using a Cloud Render Farm, like 3S Cloud Render Farm, can speed up your rendering process significantly. With powerful cloud servers, 3S Cloud Render Farm provides the following benefits:
- Fast Rendering: High-performance servers complete your renders quickly, allowing you to focus on other aspects of your project.
- Scalability: Handle complex projects without the limitations of local hardware.
- Affordability: Only pay for the rendering time you use, making it cost-effective for both small and large projects.
- Convenience: Upload your scene and render it remotely, freeing up your local machine for other tasks.
With 3S Cloud Render Farm, you can render high-quality models and animations faster, making it the perfect solution for Blender sculpting artists.
>>> Read more: What is Physically Based Rendering (PBR)? Realism in Digital Materials
Final Thoughts
Blender sculpting offers a world of creative possibilities. By mastering the basics and experimenting with advanced techniques, you can create stunning 3D models that stand out. Whether you’re sculpting for animation, games, or just personal projects, learning how to use Blender’s sculpting tools is an essential skill for any 3D artist.
If you’re working with complex models and need faster rendering times, consider using 3S Cloud Render Farm. With its powerful servers and efficient render pipeline, 3S Cloud Render Farm helps you bring your Blender creations to life faster and more efficiently.