In the world of 3D design and digital visualization, one concept reigns supreme when it comes to realism—photorealism. Whether you’re creating architecture, product designs, or cinematic VFX, the ability to make your renders indistinguishable from real-life photography is a skill that sets professionals apart. With powerful tools like Blender, even independent artists can now achieve studio-quality results. In this blog, 3S Cloud Render Farm will explore what photorealism is, why it matters. Also, we will delve into how you can master photorealism in Blender step by step. Now, let’s get started!
What is Photorealism? Why is It Important?
Photorealism in 3D rendering refers to creating images that are virtually indistinguishable from real-world photographs. It involves accurate lighting, realistic materials, believable textures, and camera behaviors that mimic real-life optics.
Achieving photorealism in Blender is very important, because:
- Client Trust: Realistic renders help clients visualize the final product or building with confidence.
- Marketing Impact: High-quality visuals attract more attention in ads and presentations.
- Design Validation: Helps identify flaws in design before production or construction.
- Portfolio Quality: A photorealistic portfolio gives you a competitive edge in creative industries.
The Photorealism Pyramid
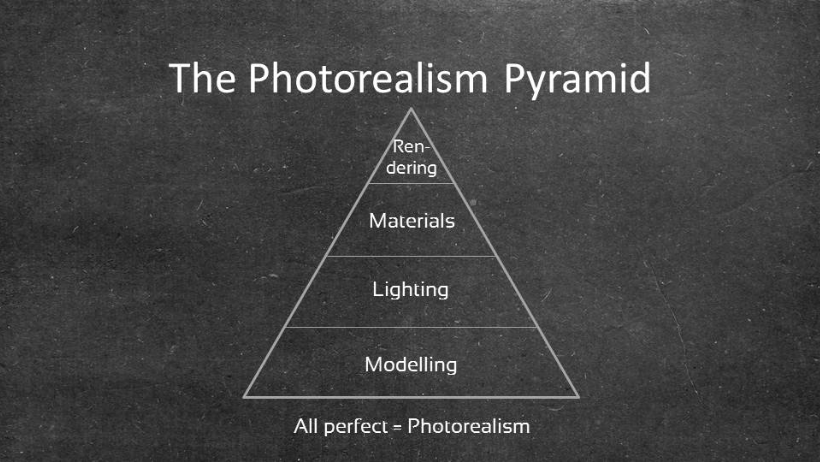
Achieving photorealism is not about using a single technique but combining multiple pillars that work together. Think of it as a pyramid built on the following foundations:
#1. Modeling
Precise geometry and proportions are the backbone of realism. Details matter—use bevels, avoid overly perfect edges, and match real-world references.
#2. Realistic Materials and Textures
Use physically based rendering (PBR) workflows with maps such as:
- Albedo (base color)
- Roughness
- Normal/Bump
- Displacement
- Specular or Metallic
High-resolution textures from sources like Poliigon, Quixel, or CC0 libraries are crucial.
#3. Lighting
Lighting is arguably the most important aspect of photorealism in Blender. Techniques include:
- HDRI environments for natural ambient light
- Area and spotlights for directional control
- Accurate light intensity and color temperature
#4. Camera Settings
Use Blender’s camera settings to replicate real-world photography:
- Adjust focal length (35mm, 50mm, etc.)
- Enable depth of field (DoF)
- Use motion blur and sensor size
#5. Rendering Settings
Utilize Blender’s Cycles engine for ray-traced lighting, global illumination, and caustics. Ensure:
- Sufficient sample count (reduce noise)
- Denoising enabled
- Color management via Filmic Blender
#6. Post-Processing
Final polish is done in Blender’s compositor or software like Photoshop. Adjust:
- Exposure and contrast
- Saturation
- Bloom and glare
- Sharpening
>>> Read more: 3D Design Trends That Will Define 2025
How to Achieve Photorealism in Blender?
Follow this practical workflow to get closer to true photorealism in Blender:
Step 1: Gather Real-World References
Analyze photos of your subject from different angles and lighting conditions. Understanding how light interacts with surfaces in real life is essential.
Step 2: Build Clean, Detailed Models
Use modifiers (Subdivision, Bevel) carefully. Avoid overly sharp geometry unless intentional.
Step 3: Apply High-Quality Textures
Use UV mapping correctly. Don’t stretch or repeat low-res textures. Add imperfections like dust, smudges, and edge wear.
Step 4: Setup Realistic Lighting
Start with an HDRI for ambient light and add artificial lights to simulate indoor lamps, sun, or reflections. Use a 3-point lighting setup for control.
Step 5: Configure the Camera
Use a real-world focal length, activate depth of field for close-up shots, and ensure camera positioning mimics photography framing.
Step 6: Render with Cycles
Switch to Cycles for accurate light bounces and shadows. Set samples to at least 512 or more depending on the scene complexity.
Step 7: Post-Process the Image
Add contrast, lens flares, chromatic aberration, and subtle film grain for realism. Use Blender’s Compositor or external software to fine-tune the final image.
Final Thoughts
Mastering photorealism is a journey of observation, technique, and continuous learning. Thanks to Blender, artists now have access to powerful tools that can produce jaw-dropping, professional-quality results. By focusing the photorealism pyramid, achieving photorealism in Blender is not just possible. It’s entirely within reach for anyone willing to practice.
3S Cloud Render Farm – Your Trustworthy 3D Rendering Partner
It can be said that, high-quality photorealism demands powerful rendering hardware. Whether you’re creating short films, architectural walkthroughs, or product shots in Blender, rendering large scenes can be time-consuming on personal computers.
3S Cloud Render Farm offers a fast, reliable, and scalable solution for artists and studios:
- Optimized for Blender and Cycles
- Pay-as-you-go pricing with real-time monitoring
- Easy-to-use interface and 24/7 support
- Render high-resolution scenes without hardware limitations
Let 3S Cloud Render Farm help you bring your most realistic projects to life—faster, smarter, and with professional results every time!
>>> Read more: Using Blender for Product Visualization: From CAD to Photoreal