When working with Blender, creating stunning 3D visuals doesn’t stop at modeling or texturing. To achieve professional-quality results, especially in films, commercials, and product visualization, compositing plays a key role.
In this blog, we’ll walk you through essential tools and techniques for advanced compositing in Blender. Moreover, we’ll explain how using a Blender Render Farm like 3S Cloud Render Farm can significantly speed up your rendering process and enhance the final output.
Why Compositing Matters in Blender
First of all, compositing is the process of combining multiple visual elements into one final image. Instead of re-rendering your entire scene every time you want to tweak something, compositing allows you to adjust lighting, color balance, effects, and much more in post-production.

This means you can:
- Refine visuals faster
- Add effects like depth of field, fog, glow, and color correction
- Save time by not having to re-render your whole animation or scene
Especially when you’re using a Blender Render Farm, optimizing render passes and layers can cut your render time while giving you more control in post.
Getting Comfortable with Blender’s Compositor
If you’re using Blender for your 3D projects, getting familiar with its Compositor is a smart move. This built-in, node-based system allows you to enhance your renders directly—without needing any external software. By connecting different nodes, you can apply visual effects, adjust colors, and blend multiple image layers easily.
The best part? Once you understand the core tools, your rendering workflow becomes faster, smoother, and far more flexible.
The Most Important Nodes You Should Know
To make the most of Blender’s Compositor, here are the key nodes you’ll want to master:
- Render Layers & Passes – These help separate shadows, reflections, ambient occlusion, and other elements so you can tweak them individually in post-production.
- Alpha Over – This node lets you combine two images or layers, ideal for layering effects.
- Color Balance – Perfect for adjusting tones, highlights, and contrast.
- Blur Nodes – Useful for creating depth-of-field, adding a more realistic and cinematic touch.
How to Set Up a Simple Compositing Workflow
Getting started is easier than you think:
- Enable the Compositor and tick “Use Nodes.”
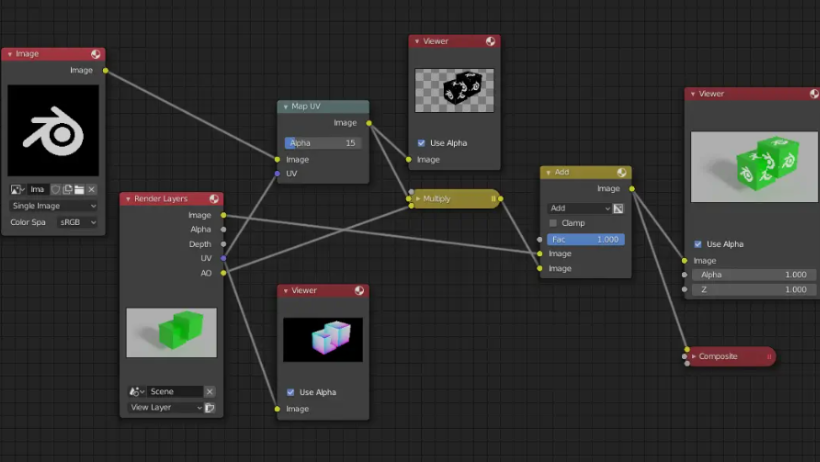
- Connect the Render Layers Node to a Viewer Node so you can preview your changes.
- Add a Color Balance Node to fine-tune your image.
- Use Blur Nodes to add soft focus or depth effects.
- Finish with an Alpha Over Node to layer or composite different elements together.
This basic workflow will dramatically improve both the quality and control of your rendering process.
Advanced Blender Composition Techniques (Level Up Your Skills!)
Blender’s Compositor isn’t limited to simple fixes. It’s a powerful toolkit that can help you achieve high-end results—without ever leaving the software. Once you dive into more advanced techniques, you’ll have full control over lighting, motion, and depth effects.
With a bit of practice, you’ll be able to create polished, professional-grade renders much faster—especially if you’re using a Blender Render Farm like 3S Cloud Render Farm for final output.
Using Render Passes to Enhance Your Renders
Instead of re-rendering your scene each time you need a small change, use render passes. These break down your scene into layers—such as diffuse, specular, and shadows—so you can tweak them individually in the Compositor.
This not only saves time but also gives you precise control to make your renders look exactly how you want them.
Adding Depth of Field (DOF) Without Re-Rendering
Want cinematic blur in your backgrounds? Instead of setting up DOF in the camera and waiting through long rendering times, just use the Z-Depth pass.
Here’s how: connect the Z pass to a Map Value Node, then to a Defocus Node. With this setup, you can create natural-looking depth without slowing down your Blender Render Farm workflow.
Motion Blur the Smart Way
Motion blur adds realism, but rendering it directly can slow things down. A better way is to use the Vector Pass and plug it into a Vector Blur Node. This way, you get smooth, dynamic motion effects during post-processing—without making your renders take forever.
Sky Replacement & Green Screen Compositing
Using the Alpha Over and Keying Nodes, you can replace a dull sky with a vibrant one or insert green screen footage into your scene.
These techniques are essential for making your Blender renders more immersive and professional—whether you’re working on animation, VFX, or product shots.
Tips to Boost Your Compositing Workflow
To get the most out of Blender’s compositing tools, here are some simple but effective tips:
- Simplify Node Setups – Avoid overly complex shader networks and remove unnecessary nodes to reduce processing time.
- Use a Non-Destructive Workflow – Keeping original meshes intact allows for easier adjustments later.
- Use Shortcut Keys – For example, pressing Ctrl+B lets you render a specific region, saving time on test renders.
Conclusion
To sum up, Blender’s compositing tools give you full control over the final look of your 3D scenes. Whether you’re a beginner or an expert, learning how to use render layers, passes, and nodes effectively will take your work to the next level.
Even better, when combined with a Blender Render Farm like 3S Cloud Render Farm, you’ll be able to achieve high-quality rendering results much faster — and with fewer headaches.
Stay creative, and don’t be afraid to experiment with Blender’s powerful compositing tools!
>> Read more: How to Create Stunning VFX with Blender’s Compositor