If you’re just getting started with 3D design or rendering, one of the most important techniques to understand is texture mapping. Although it might sound technical, it’s actually a very useful and creative tool that helps make your 3D models look more realistic.
In this beginner’s guide, we’ll walk you through what texture mapping is, why it’s used, and how you can start applying it in your 3D projects—especially in Blender. And don’t worry, we’ll keep the language simple and easy to follow.
What Is Texture Mapping?
To put it simply, texture mapping is the process of wrapping a 2D image (also known as a texture map) onto a 3D object. This texture tells your rendering software what the surface of your object should look like.
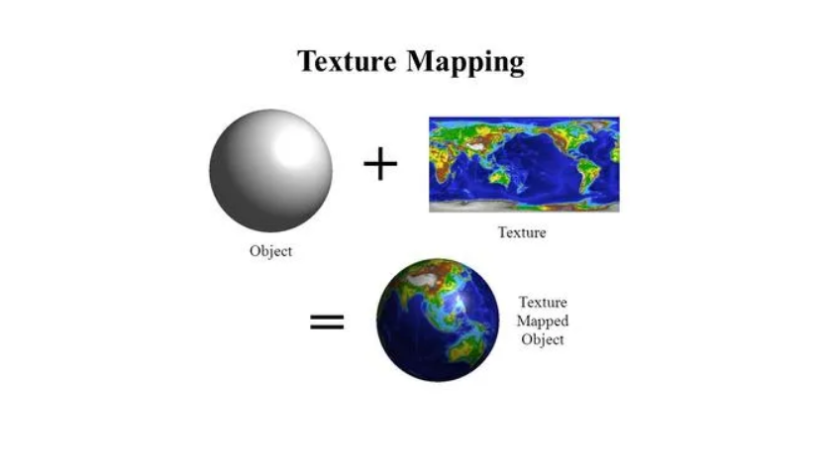
Instead of manually sculpting every small detail, you can use texture maps to add colors, patterns, and even surface details like bumps or scratches. This saves a lot of time and still gives your model a realistic look.
Think of it like putting a sticker on a toy model. The sticker adds color and detail, even though the shape of the toy hasn’t changed.
Why Texture Mapping Matters
Texture mapping is important because it makes your 3D models come to life. It adds realism and personality to your objects without increasing the complexity of your model. Instead of creating tiny physical details in your geometry, you can simulate them with the help of texture maps.
For example, instead of sculpting each brick on a wall, you can use a texture map of bricks to achieve the same look with less effort.
Common Types of Texture Maps
Over the years, many types of texture maps have been developed to create different surface effects. Here are some of the most common ones, explained in simple terms:
1. Color Map (Diffuse or Albedo Map)
This map adds color and basic patterns to your object.
2. Roughness Map
It controls how shiny or matte the surface looks. A lower value means more shine, while a higher value means less reflection.
3. Metalness Map
This map defines whether the surface is metallic or not.
4. Bump Map
It gives the illusion of surface depth by faking height. However, the surface stays flat—it only looks bumpy when rendered.
5. Normal Map
Similar to a bump map, but more advanced. It uses color to simulate lighting and depth, making details look more natural when light hits the object.
6. Displacement Map
Unlike bump or normal maps, displacement maps actually change the shape of the object. They move the points (called vertices) on the surface, creating real 3D bumps and dents.
When to Use Each Type
Now that you know the types, you might wonder: when should I use each one?
- Use bump or normal maps for small details like scratches or surface texture.
- Use displacement maps for large or noticeable height changes—like rocks, terrain, or carvings.
- Use roughness and metalness maps to control how your object reacts to light.
- Use a color map to define the object’s main look and feel.
Each type of map brings something unique. Often, you’ll use a combination of these to get the most realistic result.
Texture Mapping in Blender: A Quick Overview
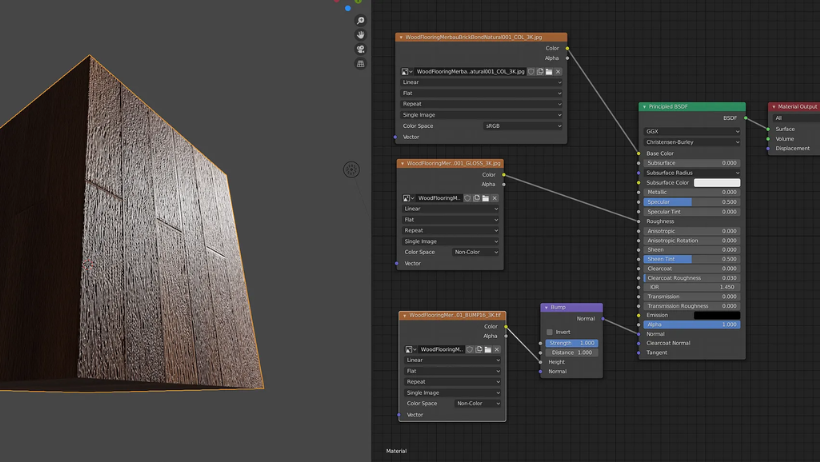
If you’re using Blender, here’s a simple breakdown:
- Add your base texture using the color map.
- Connect a bump or normal map for added surface details.
- Use a displacement map if you want actual 3D changes in your geometry.
- Adjust the strength settings to control how visible the effects are.
In Blender, you also need to enable “Displacement and Bump” under the material settings for displacement maps to work correctly.
Also, keep in mind that displacement needs a highly subdivided mesh. So, you might need to add a Subdivision Surface modifier to make it look right.
Helpful Tips for Beginners
- Start simple. Use a color map and add bump or normal maps step by step.
- Adjust the strength settings carefully—too much can make your model look unnatural.
- If you’re not getting the results you expect, try a different type of map or reduce the intensity.
- Don’t be afraid to experiment! With time, you’ll learn what works best for your projects.
Conclusion
To sum up, texture mapping is an essential technique for adding detail and realism to your 3D models. While it might seem overwhelming at first, learning to use the basic texture maps will make a huge difference in your work.
Whether you’re creating game assets, product visuals, or animation scenes, mastering texture mapping is a step toward more professional and polished renders.
And if your computer struggles with heavy scenes or high-resolution textures, don’t forget—you can always speed up your workflow with a powerful render farm.>> Read more: 3D Rendering Tutorial for Beginners: A Step-by-Step Guide